The final video is available in Youtube:
Title Screen
While animations and logos would have been nice, creating them was out of scope of this video project. I didn't want to spend too much time with the title screen, so I went with simple text with the Noto font. I colored some labels and added a gradient bar behind the main title. I wanted something moving in the screen, and settled for a panning background image. I dimmed it a bit to bring the text out better.

I wanted something moving in the screen, and settled for a panning background image. I dimmed it a bit to bring the text out better.
Images
The images are arranged in two or three video bands, so that each overlaps for two seconds with the previous and next image with a cross-fade effect.In the following is the sequence for adding an image:
- Put the image to an image folder. I preferred to put all the images under the Kdenlive project folder, so that they would not be lost if I relocate the originals. I renamed the files so that the have Author_date-title, so that I have all the information needed for the image captions.
- Add the image clip to the Project Bin, under a slide group folder. I grouped the images by author.

(Note that in this screenshot I already have the caption screens created later.) - Duplicate and rename a title clip. My title clips have name of the object in the middle, date on the left, and author on the right, all aligned to bottom of the screen. As they have three fields, I could not use templates, but had to duplicate any older title clip. Rename it after the image file, removing the ".JPG" suffix.
- Edit the title clip. (When the editor opens, it's a bit annoying that I always have to select "Show Background".) Edit the three fields according to the image name. After editing, some realignment may be necessary.

I used the Noto font with 50 px high image caption in the middle and 40 px high date and author name labels. I grayed the latter ones a bit. - Find a suitable place for the image.

- Make space in the timeline by using the "M" key tool. If you need to insert an image afterwards, you need then space for them. I used 12-second clips with 2 seconds of overlay with both previous and the following image. Add some extra space, as can always remove it later. Go back to Select mode (key "S").
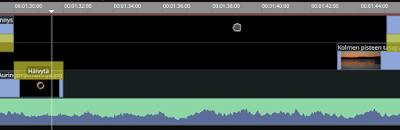
- Drag the image clip to the timeline, on an alternating band. Notice that above we used two alternating bands for cross-fading clips. Inserting a clip in the middle messes up with the alternation, unless we either add another clip OR add a fourth video band and move the clip there.

- If necessary, rescale its length by double-clicking it and set the length. My default for clips was 10 seconds, so I had to manually resize to 12 seconds.
- Add a crossfade effect of proper length to the end of the clip. I use 2 second crossfades. It's easiest to copy-paste one from another clip (Ctrl+C, Ctrl+V, and drag to place), as that also keeps the length correct. It should be "Reverse" if going down in the video stack and non-reverse if going up.
(Crossfade is "Häivytä" in Finnish) - Move the rest of the slideshow to correct position with M-mode. Now that the ending crossfade is in place, you can snap the next video clip to the beginning of the crossfade.

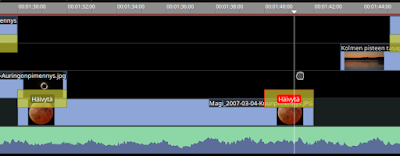
- If using three video bands, move the crossfade to the upper video clip.

- Drag the title clip to the top band. Snap it at the end of the beginning crossfade.

- Resize if necessary by dragging the end of the clip or by double-clicking the clip. My default for text clips is 8 seconds, so they get the correct length when you drag them to the timeline.
- Copy a fade effect from another title clip with Ctrl+C, Ctrl+V, and drag. I use a keyframed Affine effect for text fade-in-and-out. I have keyframes at 0:00, 2:00, 6:00, and 8:00 seconds, with respectively 0%, 100%, 100%, and 0% opacity.

- Add a keyframed Position and Zoom effect to the image clip. I have this and the Three-point-balance as a custom effect, so I just right-click the image and add the effect. The parameters need to be customized for each video clip.
- Customize the Position and Zoom effect. The keyframed start and end positions are different for almost every image, as is the initial and final zoom level. It takes some time and artistic effort to get them right.
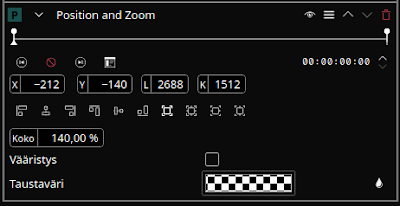
- Typically, if the image is square, you start with 140% zoom to make it fill the screen horizontally, and end with maybe 160% zoom or more.
- Configure the position so that it zooms towards a meaningful focal point or simply pans up or down.
- More zoom makes it quicker and more restless. Following similar images should have matching zoom speeds.
- You can also start with bigger area than the size of the image. In that case, it is necessary to set the effect background color to black with non-transparent opacity (255), or otherwise blended layers such as image titles will have trouble.
- While editing, because we're using cross-fade for transitions, you need to disable the other video band(s) to be able to see the ends of the currently edited clip.
- Most of my tweaking effort went to this effect, because it's really hard to get right. Especially it's a big effort to match zoom levels and exact positions in multiple images. The solar eclipse sequence was really tough to edit!
- Configure Three-point-balance. I often use this to change the contrast, but if it's OK, just leave it as is.
- Optionally, add a keyframed Rotate effect. Typically, rotate from 0 to 250 (25 degrees) or something like that.

- Test render a range around the clip.
- Fix issues.
- Tweak until you drop.


It takes around 15-30 minutes to add a picture, which makes the creation of a big gallery rather a lot of work. Working with batches, you can handle a lot of videos at once, such as when you add effects to them. It's just very important that you decide the times and transitions in advance. I believe the effects given here is are a good basic choice.
Definitely the biggest job was tweaking the zoom effects. Especially, if you look at the solar eclipse sequence, it required very exact matching of the image positions and zoom levels. Tweaking the parameters was rather difficult and they still don't match exactly in the final, but I considered it good enough.
Music
For music, I first tried the Free Music Archive. However, much of the music was for non-commercial use only. That was OK for my purposes, but the effect was also that when I added my video to Youtube, all possible ad income was directed to the musician. That didn't seem quite fair, considering that there was me and others who made the video and its contents. While there was some more free music in Free Music Archive, I noticed that the Youtube Audio Library had a somewhat better selection.
There was very little editing involved with the music. The piece was a bit longer than what I needed, so I truncated it and silenced the end.